One Way Slab Reinforcement Details & Design
What is one way slab
A one way slab is a slab that carries its load in one direction only. This happens when the slab is supported on two opposite sides only, or when it is supported on all four sides but its longer span is more than twice its shorter span. For how it compares with a slab that bends both ways, see one way slab vs two way slab.
Using some basic math, we can write this as: Longer span ÷ Shorter span > 2 (for a slab supported on four sides)
In other words, the short direction is so much stiffer that almost all the load travels across the short span to the two long supports, and the short edges carry very little.
So the main (primary) bars run parallel to the short span, and the distribution bars run at right angles to them, along the long span.
One way slab design
Steps to design one way slab
- Determines the kind of slab being used.
- Choose a trial thickness from the span-to-depth (deflection) limits of IS 456 and round it up to the next 10 mm.
- In common practice, room slabs are rarely thinner than about 110–125 mm.
- Thin cantilever slabs such as sunshades (chajja) are often around 75–100 mm at the tip, as designed.
- Work out the dead load (self-weight, floor finish) per square metre.
- Convert it to load per metre run of a 1 m wide strip.
- Take the live (imposed) load for the room use from IS 875 (Part 2).
- Convert it to load per metre run of the same 1 m strip.
- Calculate the total factored load per unit strip in kilonewtons per metre.
- Find the design bending moment (Mu) and shear across the short span.
Determine effective depth.
d = h – (nominal cover + ½ × bar diameter) Nominal cover comes from the exposure condition in IS 456 (20 mm for mild exposure). Slab main bars are commonly 8, 10 or 12 mm.
- Check that the effective depth provided is at least the depth required for the design moment.
- Perform the appropriate calculations for a width of 1 metre.
- Work out the minimum steel needed for distribution, shrinkage and temperature (see below).
- Choose the diameter and spacing of the main bars to provide the required steel area.
- Make sure that the minimum and maximum spacing requirements are met.
- Main bars: spacing not more than 3 × effective depth or 300 mm, whichever is less.
- Distribution bars: spacing not more than 5 × effective depth or 450 mm, whichever is less. If bars would be too close to place concrete properly, use a larger diameter at wider spacing.
- For continuous slabs, provide top (negative) steel over the intermediate supports, either by bending up some bottom bars or with separate extra top bars, as the design requires.
- Figure out how many distribution bars there are. Determine its diameter as well as its spacing.
- Check the slab for shear.
- Detailing should be carried out, and the results should be shown on the drawings.
- Make a schedule for the bending of bars based on the relevant parameters.
One way slab reinforcement details
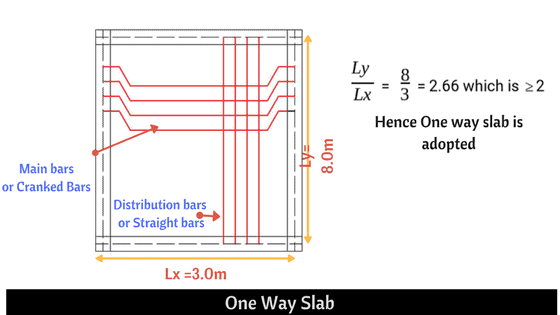
In a one-way slab, the main bars run parallel to the shorter span and sit in the bottom layer. The distribution bars run along the longer span and are placed above the main bars, as shown in the image above.
Read more: Shear Wall- How to construct, Types, Advantages & Disadvantages
The slab bends across its short span, so that is the direction that needs the main tension steel. The load is passed to the two long supports, which is why the beams or walls along the long sides carry most of it.
Put simply, the main bars run perpendicular to the long supports, that is, parallel to the short direction. The distribution bars do not carry the main bending, but they are still essential: they spread concentrated loads sideways, hold the main bars at the correct spacing, and control cracks from shrinkage and temperature changes.
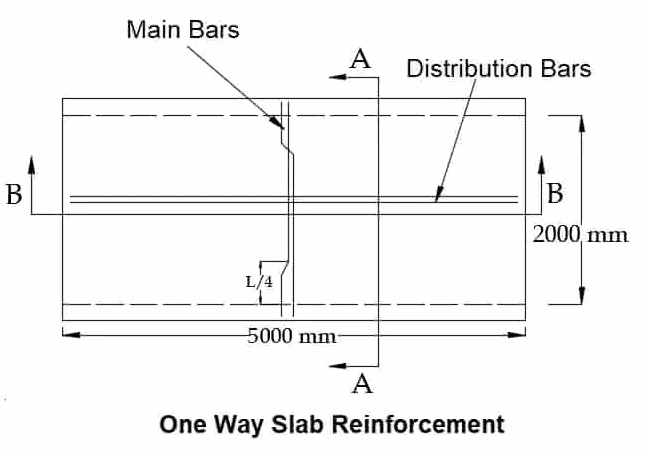
The bigger span in the above slab, 5000, divided by the shorter span, 2000, is 2.5, which is more than 2.
Therefore it is a one-way slab. As the drawing shows, the main bars (here the larger diameter) run across the 2000 mm short span, and the distribution bars run along the 5000 mm length.
Calculation of One-Way Slab Reinforcement
The main steel for a one-way slab is calculated in limit state design by balancing the compressive force in the concrete against the tensile force in the steel. IS 456 (Annex G) gives:
Ast = 0.5 × (fck / fy) × [1 − √(1 − 4.6 Mu / (fck × b × d²))] × b × d
Where: Ast = area of tension (main) steel; fck = characteristic compressive strength of concrete (for example 20 N/mm² for M20); fy = characteristic yield strength of steel (for example 500 N/mm² for Fe500); Mu = design (factored) bending moment; b = width of the strip (1000 mm); d = effective depth. Minimum and distribution steel: at least 0.12% of the gross cross-sectional area (Ag) for high-strength deformed bars such as Fe415 and Fe500, or 0.15% of Ag for mild steel bars. This minimum applies in each direction, so it usually sets the distribution steel.
Conclusion
A one way slab bends in one direction only: either it is supported on two opposite sides, or it is supported on four sides with a long-to-short span ratio of more than 2. Typical examples in Indian houses are verandah and corridor slabs, chajja (sunshade) and the waist slab of a staircase. Whether it is cheaper than a two-way slab depends on the panel shape: for long, narrow panels one-way action is natural, while near-square rooms are usually designed as two-way slabs.
- If four sides are supported, divide the longer span by the shorter span; if the result is more than 2, the slab is designed as one-way.
- If it’s only supported on two sides, it’ll always be a one-way slab.
- The main reinforcement runs in the shorter direction, sized for strength and deflection; distribution steel runs along the longer direction.

Tanmay Arora, is an Architect with an experience of 13+ years. He is a Management Grad with a post Graduate Diploma in Building Construction and Materials. Tanmay has worked with renowned firms. He has graduated in Bachelor of Architecture. His deep interest in Architecture and Civil Engineering and his experience has made him one of the best architects a client can think of.